Mastering Snipping Tool Shortcut On Chromebook: The Ultimate Guide
Chromebook users often seek efficient ways to capture screenshots or snippets quickly, and mastering the snipping tool shortcut on Chromebook is essential for boosting productivity. Whether you're a student, professional, or casual user, understanding how to use these shortcuts can make a significant difference in your workflow. This guide will walk you through everything you need to know about snipping tool shortcuts on Chromebook, ensuring you can seamlessly capture and edit images without hassle.
In today's digital age, the ability to capture and share visual content quickly is crucial. Chromebook, with its user-friendly interface and lightweight operating system, offers several methods to take screenshots and snips. By learning the snipping tool shortcut on Chromebook, you can streamline your tasks and save valuable time. This article will delve into the nuances of using these shortcuts, providing step-by-step instructions and expert tips.
Whether you're a beginner or an experienced Chromebook user, this comprehensive guide will equip you with the knowledge and skills to maximize the functionality of your device. We'll explore various shortcuts, tools, and techniques to help you master the art of screen capturing on Chromebook. Let's dive in and unlock the full potential of your device.
Read also:Richard Giannotti The Visionary Entrepreneur Shaping The Future
Understanding the Basics of Snipping Tool on Chromebook
What is the Snipping Tool Shortcut on Chromebook?
The snipping tool shortcut on Chromebook refers to the combination of keys that allow users to capture specific portions of their screen quickly. Unlike traditional Windows or Mac devices, Chromebooks use unique keyboard shortcuts to perform this function. By pressing the "Ctrl + Shift + U" keys simultaneously, users can activate the snipping tool and select the area they wish to capture. This feature is particularly useful for highlighting specific details or creating visual aids.
Why Use Snipping Tool Shortcuts?
Using snipping tool shortcuts on Chromebook offers several advantages:
- Speed: Capture images faster without navigating through menus.
- Efficiency: Focus on specific areas of the screen for better precision.
- Convenience: Access the tool directly from the keyboard, saving time and effort.
These shortcuts are especially beneficial for users who frequently need to capture screenshots for presentations, tutorials, or documentation purposes.
Step-by-Step Guide to Using Snipping Tool Shortcut on Chromebook
Activating the Snipping Tool
To activate the snipping tool on your Chromebook, follow these simple steps:
- Ensure the screen you wish to capture is visible.
- Press the "Ctrl + Shift + U" keys together.
- A crosshair cursor will appear, allowing you to select the area you want to capture.
Once the area is selected, the image will be automatically saved to your Chromebook's screenshot folder.
Exploring Additional Shortcut Options
Capturing Full Screens
In addition to the snipping tool shortcut, Chromebook users can capture entire screens using the "Ctrl + F5" key combination. This method is ideal for saving full-page views without cropping or editing. It's particularly useful when you need to document an entire webpage or application window.
Read also:007 Cavill A Comprehensive Look At The New James Bond Era
Capturing Specific Windows
For capturing individual application windows, use the "Ctrl + Shift + F5" shortcut. This option allows you to save only the active window, excluding other elements on your screen. It's perfect for focusing on specific applications or documents.
Advanced Techniques for Snipping Tool Usage
Customizing Shortcut Keys
Chromebook users can customize their keyboard shortcuts to better suit their preferences. By navigating to the "Settings" menu and selecting "Advanced," users can modify shortcut keys for various functions, including screen capturing. This feature enables greater flexibility and personalization, enhancing the overall user experience.
Editing Snipped Images
After capturing a snip, users can edit the image using built-in tools or third-party applications. Chromebook's default screenshot editor allows basic modifications such as cropping, resizing, and adding annotations. For more advanced editing, consider using applications like Google Photos or Canva.
Troubleshooting Common Issues
Shortcut Not Working
If your snipping tool shortcut isn't functioning as expected, consider the following solutions:
- Ensure your Chromebook's keyboard is functioning properly.
- Check for any conflicting applications that may interfere with shortcut keys.
- Restart your device to reset system settings.
By addressing these potential issues, you can restore the functionality of your snipping tool shortcut.
Best Practices for Using Snipping Tool on Chromebook
Organizing Captured Images
To maintain an organized system, create dedicated folders for storing captured images. Label each folder according to its purpose, such as "Work Projects" or "Personal Documents." This practice ensures easy retrieval and prevents clutter on your device.
Securing Sensitive Information
When capturing screens that contain sensitive information, ensure proper security measures are in place. Use password protection or encryption tools to safeguard your data from unauthorized access. Additionally, delete unnecessary screenshots promptly to minimize risks.
Comparing Snipping Tool Shortcuts Across Devices
Chromebook vs. Windows
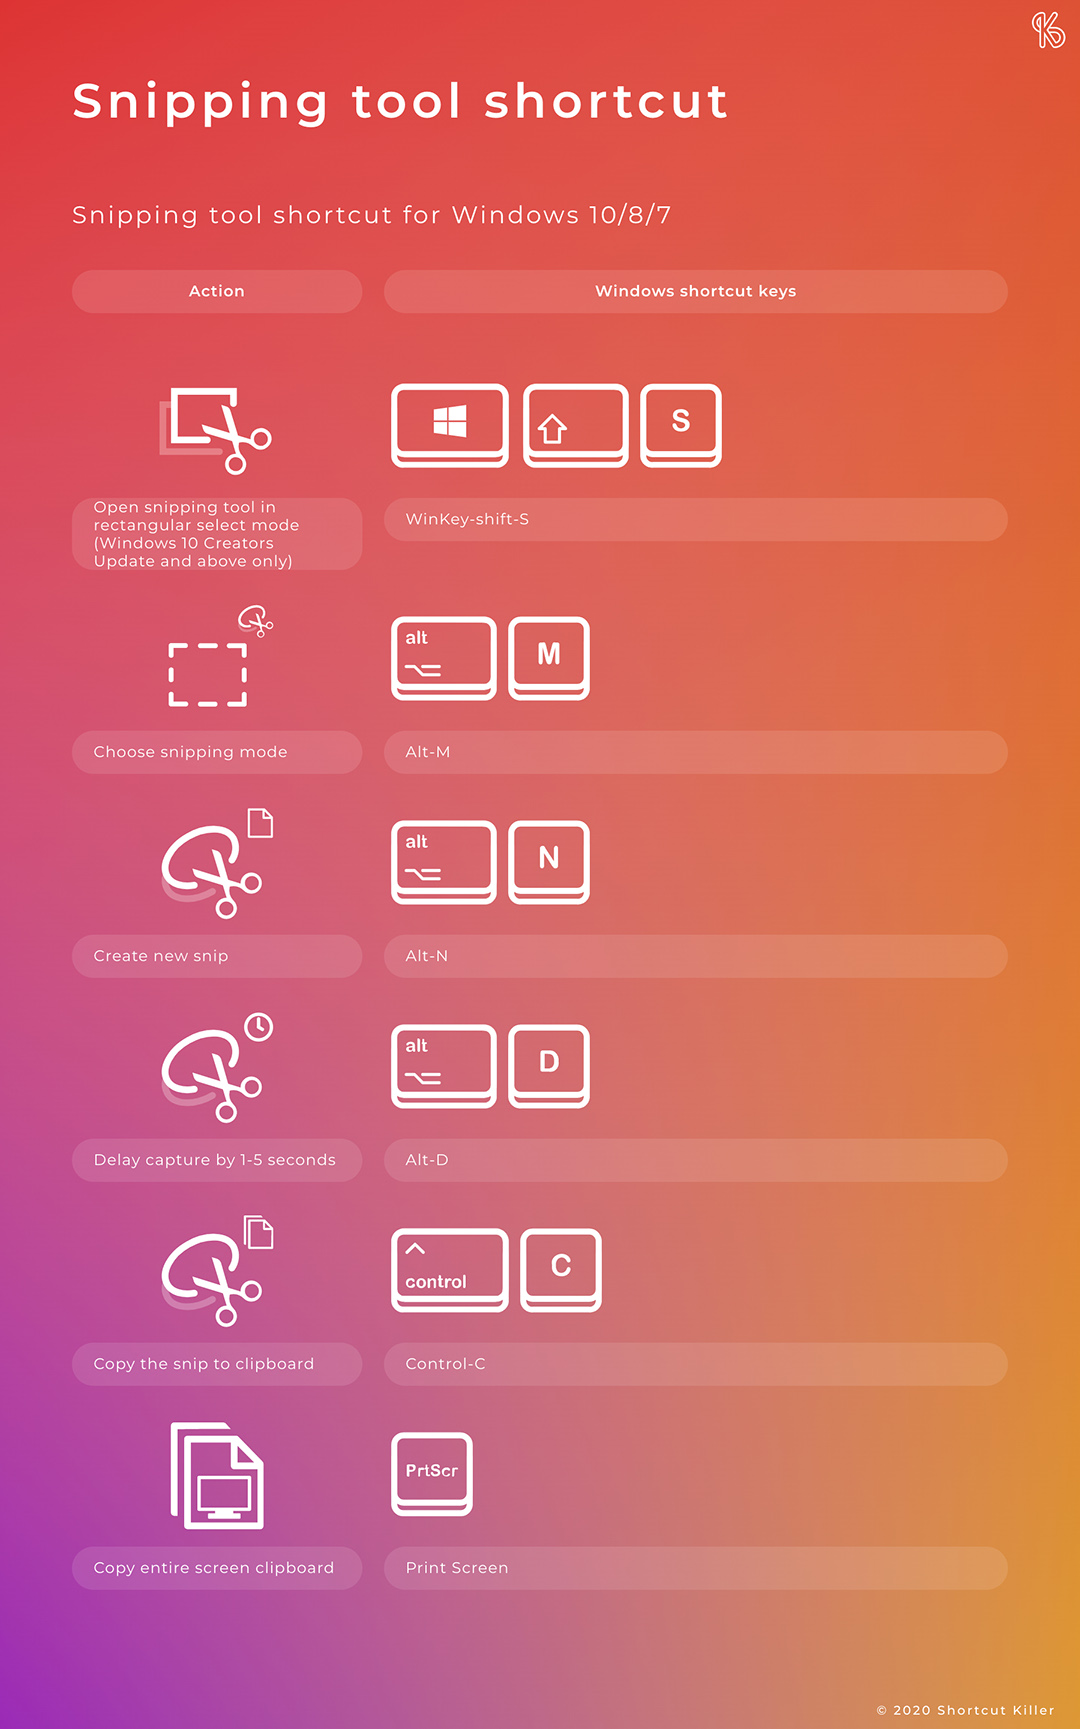
While both Chromebook and Windows devices offer snipping tool shortcuts, their functionality differs slightly. Chromebook's "Ctrl + Shift + U" combination provides a straightforward method for capturing specific screen areas, whereas Windows users can utilize the "Windows + Shift + S" keys for similar results. Understanding these differences can help users transition smoothly between devices.
Chromebook vs. Mac
Mac users rely on the "Command + Shift + 4" shortcut for capturing specific screen regions, while Chromebook users employ the "Ctrl + Shift + U" combination. Both methods are efficient but cater to different user preferences and device capabilities.
Future Developments in Screen Capturing Technology
Upcoming Features for Chromebook Users
As technology continues to evolve, Chromebook users can expect enhanced screen capturing capabilities in the future. Developers are exploring innovative features such as AI-driven image recognition and improved editing tools to elevate the user experience. Stay updated with the latest developments to make the most of your device.
Conclusion and Call to Action
In conclusion, mastering the snipping tool shortcut on Chromebook is essential for enhancing productivity and efficiency. By understanding the basics, exploring additional shortcut options, and implementing best practices, users can seamlessly integrate this feature into their daily routines. Remember to organize captured images, secure sensitive information, and stay informed about future developments in screen capturing technology.
We encourage you to try these shortcuts and techniques on your Chromebook. Share your experiences in the comments section below and let us know how they've impacted your workflow. Don't forget to explore other articles on our website for more tips and tricks to maximize your Chromebook's potential. Happy capturing!
Table of Contents
- Understanding the Basics of Snipping Tool on Chromebook
- Step-by-Step Guide to Using Snipping Tool Shortcut on Chromebook
- Exploring Additional Shortcut Options
- Advanced Techniques for Snipping Tool Usage
- Troubleshooting Common Issues
- Best Practices for Using Snipping Tool on Chromebook
- Comparing Snipping Tool Shortcuts Across Devices
- Future Developments in Screen Capturing Technology
- Conclusion and Call to Action

